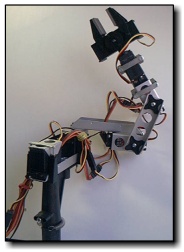
My adventure in purchasing and
implementing the Robix Rascal robotic arm kit in a developmental disabilities workshop/educational
setting.
This
blog was started simply to provide firsthand information to anyone
interested in the Robix Rascal robotic arm kit from Robix.com.
When I was
getting started, I had trouble finding any such information and decided
to start this blog as a resource for others.Please feel
free to contact me with any questions or comments. May 28, 2010 I'm
moving along quite well in my effort to control the Robix Rascal using
just a microcontroller-based device. I decided to go from 21
available program steps to 20. I used the extra EEPROM locations
to store the rest position for the robot. That way, I can set the
robot to what I want the rest position to be, then program it into the
system so the next time I power up, the rest position will still be
there along with the rest of the robot program. My device is
actually working very well and I'm surprised what the robot can
accomplish in 20 steps or less. Programming works much as it does
with the USBOR and laptop: I use the buttons on my programming
interface to move the robot to each desired position, then press the
"store" button to load that position into the EEPROM. When I run
the program, each set of motor positions is read in sequence from the
EEPROM and the robot moves from one to the other just as with the
software provided by Robix. As soon as I have everything
constructed and finalized, I'll post my schematics, microcontroller
program, pictures and videos. It's going to be so nice to just
grab Murray (the robot), my device, and a power supply and be able to
quickly move him anywhere and get him set up quickly. April 30, 2010 Just
a quick update. My endeavor to move control of the Rascal from a
laptop and an USBOR to a microcontroller chip is going great! I'm
using a PIC16F628A which only has one PWM output pin; so, I have
written my own routine to continually update all of the motors with
ongoing PWM on six different pins to six different motors while the
program is running.
I'll be honest, so far this project is
working out far better than I even expected. I'm using the chip's
on-board EEPROM to store the robot program steps to allow for program
retention even when power is turned off. Since I have six motors, using the EEPROM only allows for a program
of up to 21 steps (128 locations divided by six motors), but that is more than enough for most of what I use
the Rascal for here at work. That is also more than enough steps
for a good demo. Once I get everything finalized, I can always
hook up an outboard serial EEPROM chip to increase the steps to
thousands. But, for right now, I'm keeping things quick and
simple.
A few days ago, I thought of a great result from this
project: When all is done and working properly, I'll be able to
free Murray (my Rascal's name) from ALL tethers except those going to
the motors themselves. That will mean NO computer and NO USBOR!
In fact, I could even put together a D-Cell battery pack and run
the robot without even having to plug anything into an AC wall socket!
I will literally be able to grab the robot, the little controller
box and the battery pack and go wherever I want with it. I
PROMISE that when this project is finished and working, I WILL post my
firmware, my electronic schematics, some pictures and maybe a video or
two so others can continue from where I leave off. This is so
much fun! Sometimes I can't believe I get paid to help people by
doing something I love! April 14, 2010 Work
has slowed down a bit around here, and as I usually do, I am taking
advantage of the slowdown to continue advancing my various Robix Rascal
projects. Although I haven't completed my acoustic interface, and
haven't given up on it either, I have temporarily moved on to a new
project which will be of more immediate use. I will return to the
acoustic interface at a later date.
I was out on the workshop
floor the other day while folks with various disabilities were working
hard on the various jobs for which they are paid. I noticed a
quadriplegic gentleman sitting there watching everyone else work.
Because the job involved packing light parts into a small box to
be shipped to retail stores, there was no way for him to participate.
This particular man uses some of my various computer interfaces
to do work on the computer, but when there are no computer jobs on the
schedule, there aren't many other options for him. As I walked by
and saw him sitting there with the desire to work, but without the
means to do so, I realized that Murray (my Robix Rascal) could easily
put those parts into that box. I can't be without my laptop here
at work, so I can't put it out on the floor to operate Murray.
Besides which, that wouldn't be a very safe place for the laptop.
I
came to the conclusion that there needs to be an inexpensive way for me
to quickly program Murray for a simple, repetitive task without him
needing to be tethered to a laptop computer. I envisioned a small
device containing control circuitry for Murray, and a jack into which
to plug a single switch to initiate a program. I would load into
the device a program of steps for Murray to follow, then each time the
switch plugged into the jack were pressed, Murray would follow the
steps then return to his rest position until the next switch press.
Thus, each time a box was ready to be packed with parts, the
quadriplegic gentleman, or anyone else for that matter, would need only
press the switch on his wheelchair to start the program and have
Murray pack the box. I want to make the programming interface
separate so I can plug it into my controller box, program Murray, then unplug it so no one
else can interfere with the programming. the 16F84A is rather
outdated and lacks the power I will need for this project, so I'm
biting the bullet and getting some 16F628A microcontrollers which I will
teach myself to use, then utilize them in my design. August 6, 2009
I 've been continually thinking about, and occasionally actually
working on, finding a good way to create a simple interface so that
folks who are quadriplegic can operate the robotic arm without
assistance using only a single button they can press with their head.
I came up with a pretty unique solution that seems to be working reasonably well. I created a simple program using GameMaker
that outputs specific tones when a button on the GUI is clicked.
I used Goldwave to create the tones and save them as WAV
files. I then used the various WAV files to create sound objects
in the GameMaker
program. I created tones from 500HZ to 10KHZ in 500HZ increments.
I have the program set up to depict 6 servo motors with two
directions for each (CW and CCW). The program slowly scans
through the various motors and their two possible directions until the
user presses the switch on his wheelchair which is wired into the left
click button on a mouse modified as described in an earlier blog entry.
When the button is pressed, whichever motor and direction was
highlighted at that instant determines which of the tones is sent out
via the sound card/headphone jack.
I decided to use square
wave tones via the headphone jack as my interface to the robot since
most of the specialty computers mounted to the wheelchairs of persons
with developmental disabilities already have most, if not all, of the
USB ports taken up. Besides, the circuitry needed to interface to
a USB port was a bit more involved than I cared to undertake.
I
used a PIC16F84A to receive the tone, determine which tone it is
receiving, and output an appropriate pulse width modulation signal to
move the appropriate motor in the desired direction until the user
releases the button. I know that the 16F84A is an outdated chip,
but I happen to have a few of them laying around and, since money is
tight around here, I decided to use those up first before trying to buy
newer chips for my inventory of parts. The arrangement provides
reasonable precision for what I'm doing, but is noticeably less
repeatable than when using the USBOR that came with the robot.
One of the advantages to this audio tone approach is that I can
create a "program" of sequences for the robot to follow by simply
creating an MP3 file of the collections of tones. Once such a
"program" is created, I can remove the robot from the computer
completely, and run the program by playing an MP3 player into the input
pin of the microcontroller chip. My next challenge is to create a
stand-alone, microcontroller-based tone generator so that the robot can
be controlled directly without the need for any computer at all.
After that, I'll come up with a way for the controller to store
the sequences of tones so that a program of robot movements can be
created, saved then run as desired. As soon as my prototyping and
experimenting are done to the point that I have circuitry, firmware and
software that are good enough, I'll post them here for others to
experiment with.
When I have everything the way I want it, I'll
have a small, portable means of directly controlling the robotic arm
with no laptop, or other computer, necessary.
May 2, 2008
I
have been away from my Robix Rascal project for quite a while (too
long) due to being pulled off to work on other projects. I'm
now
trying to find ways to access the Rascal using a laptop and
self-written software. I am a science teacher and electronics
technician, not a programmer, but I still manage to do some very simple
programming using GameMaker and Visual Basic.Net.
I'm hoping to find a way to access the Rascal's control
software
via it's .dll file in order to send commands to the robot using my own
software. Like I said, though, my programming skills are very
rudimentary so I am struggling somewhat trying to teach myself enough
programming to be able to implement my own software interface to the
Rascal. I have been searching the Internet for months trying
to
find examples that might help me. The only one I can find is the
example VB program that comes on the Robix software disk.
Unfortunately, the example VB program from Robix sends
commands to the Rascal via a VB.Net console instead of a Windows
Application GUI. What I want to do is create a standard
Windows
Application GUI with a virtual button that can be clicked to send a
command to the Rascal. If I can find a VB example that sends
even
a single command to the Rascal via the click of a virtual button, I can
expand upon that example to create the software I'm attempting to write
for myself.
I
want to send commands to the Rascal using my own
software so that I can tailor the software to the specific needs of the
physically challenged persons who will be using it. I would
eventually like
to have a Windows GUI scan through choices of clickable buttons and
have the person in the wheelchair press the switch on their wheelchair
to
click the currently selected button and move the Rascal in the
indicated direction as long as the button is held down. Such
an
interface would allow wheelchair-bound persons with severe physical
limitations to control the Rascal directly without any assistance.
I can hardly wait to see a quadriplegic person who has been
stuck
in a wheelchair their entire lives be able to actually pick up small
manipulatives and move them around. As I have already
mentioned,
I use a very long wire from the switch on the wheelchair so that the
physically challenged person operating the robot is at a very safe
distance. If you attempt any of what I am doing, make sure
the
operator is at a safe distance and is wearing a pair of approved safety
goggles.
The
Rascal came with
small plastic balls as manipulatives. I have added to my set
Q-tips, cotton balls, 1" lengths of 5/8" PVC pipe, various sizes of
rubber O-rings and 1/2" wooden cubes. I keep all of my
manipulatives small and light in order to reduce the chances of
injury to humans or robots. I will consider my
self-made software adequate when one of our quadriplegic persons is
able to use it to pick up and stack the wooden cubes without
assistance. As soon as I come up with something adequate and
practical, I will post it here. If anyone would be willing to
donate time and effort to help me with the software aspect of this
project, please contact
me. September 27, 2007
I
have found that getting all of the manipulatives (the things for the
Rascal to pick up and manipulate) set up from one trial to the next is
very difficult. If the manipulatives are not in the exact
same
location and orientation each time, the Rascal cannot manipulate them
with much accuracy or repeatability. This of course was no
surprise to me, but it did prove to be a bigger problem than I had
anticipated. I tried putting pieces of masking tape on the
table
top and labeling them as to which manipulative would be placed there.
This worked fairly well until I had to move the Rascal from
one
location to another. I needed to come up with a way to
standardize the placement of the manipulatives for the robot regardless
of when and where I moved it.
I
solved
the problem by
making a very simple "desk top" for the robot. The desk is
simply
a 1/4 inch thick piece of composite plastic board which I can set on
top of
whatever surface I am placing the robotic arm. The plastic
board
was just something I had laying around, so I'm not sure where such
material could be found. I would think a trip to the hardware
store or Home Depot might net some results. I'm not sure if
anyone makes them, but a 1/4" thick plastic cutting board might work as
well. I would think
that sufficiently flat, 1/4" plywood could also be used as long as the
plywood didn't end up warping over time. Any warping in the desk could
just about render it useless, so I'm sticking with the plastic and I
don't really recommend trying it with plywood. The
desk is 16 by 20
inches and, using a metal yardstick and a utility knife, I created
vertical and horizontal lines at 1 inch intervals. Using an
electric engraver, I labeled
the
vertical lines with letters of the alphabet and the horizontal lines
with numbers. I drilled 1 inch and 7/16 inch holes in the
board
to accommodate the two front rubber feet on the bottom of the robot
along with the bolt that holds the pivot assembly in place. I
positioned the holes so that the metal weight along the bottom of the
robot base rests tightly against the edge of the desk. In
other
words, the back two rubber feet of the robot are actually on the table
and the front two are dropped into the 1 inch holes. I then
push
down lightly on the robot's base to make sure those two front feet are
snuggly seated. In making the desk, it is imperative that the
robot fit snuggly in the holes and tightly against the edge of the
desk. That is what assures that the robot is in the exact
same
position each time it is set up. To make sure I got the hole
placements perfect, I first made a paper, then cardboard pattern which
I then transferred to the desk material after everything was right.
I think I had to make two or three patterns until I got it
perfect. Lastly, I used the tip of a 3/8" drill bit to make a
couple of dimples in the desk's surface to act as permanent wells to
hold the little wooden balls that come with the Rascal kit.
When
I write a script of commands for the
robot, I
include a comments section into which I type the number/letter
coordinates of where each manipulative goes. That way all I
have
to do is load the script, read the comments, and place all of the
manipulatives accordingly. I have found that this desk method works
very well. If I take the robot somewhere for a demonstration
or
to perform an actual work task, it runs the scripts successfully every
time provided I get the location for each manipulative right.
As
long as the robot's configuration utilizes the base that comes with the
Rascal kit, I can build the robot into various configurations and still
use the desk to place manipulatives consistently.
August 16, 2007
With
practice, I am getting very adept at programming the Rascal robotic
arm. The person I am currently working with is confined to a
wheelchair and can only use his head to press a switch attached to his
headrest. I bought an inexpensive, optical mouse at Radio
Shack and drilled a 1/4" hole into the case at the end farthest from
the mouse buttons. In the hole, I mounted a 1/8" phone jack
also purchased from Radio Shack. Using very thin wires, I
paralleled the jack with the left click button inside the
mouse.
With the switch on the man's wheelchair plugged into the jack on the
mouse, he can perform a left click by using his head to push the button
on his headrest. After using the Nexus software to write a
script for the Rascal, I set the mouse cursor on the green 'run from
top' arrow at the top of the software window. Now, when the
man presses the switch on the headrest of his wheelchair, he is
essentially clicking on that 'run' arrow and starting the script thus
making the Rascal run the commands in the script. For safety,
I use a very long wire so that the operator is across the room from the
robot. I'm amazed at how quickly students can learn the
basics of
robotics and understand the simple programming used by the Robix
Rascal. I'm hoping to eventually come up with a way for
people
with severe physical limitations to program and control the robotic arm
without any physical help. It would be a real thrill to see such
students able to write a simple script and then run it for themselves. July 13, 2007
I
assembled my Rascal in the "chemist" configuration provided in the
instructions which came on a CD along with the Rascal. It was
the first time assembling, and this is one of the more complicated
configurations, yet it still took me less than an hour to get it
assembled. After some practice, I can do it in 20 minutes or
so now. All of the tools needed for assembly and dis-assembly
come with the kit--nice!
At first the software
didn't make much sense, was a bit involved and confusing to configure,
and didn't seem very intuitive; but, following the instructions
carefully, I was able to get it configured with little
trouble. Also, you have to load two different software
packages in order to access the Rascal via the USB port.
Although it didn't make much sense to me at first, I later learned that
one of the software packages allows you to write scripts of moves for
the robot to make, and the other package acts as the interpreter
between the scripting software and the Rascal controller
itself. The advantage is that you can use other software,
rather than just the scripting software that came with the Rascal, to
access the robot via the interpreter software. A little
confusing at first, but provides a lot of flexibility not the least of
which is the ability to use C, Visual Basic, or even Java to send
commands to the robot. To save on confusion, I just wrote a
little batch file program to load both pieces of software in one
operation. The nexus and nexway links (icons) are
in a folder called "Robix" on my desktop:
@echo off
"Robix\usbor
nexus.lnk"
"Robix\usbor nexway.lnk"
Within
about 45 minutes, I had the Rascal doing some fairly complex movements
and performing some useful tasks. One such task was having
the Rascal clean up its own manipulatives (work pieces) and placing
them back in the box. Once you get used to the "teach
pendent" in the software, creating a script of commands for the Rascal
to follow is surprisingly fast and easy.
Now I just have to
find a way to let someone in a wheelchair safely and effectively
operate the Rascal robotic arm. So far, this is so much fun
that I can't believe I'm getting paid to do it! July 11, 2007
The
Rascal kit arrived today. It came in a very durable tool
box. Several times, while waiting for the Rascal to arrive, I
have watched the instructional videos available on the Robix.com
web site. The first thing I noticed when my Rascal kit
arrived, is
that the base and pivot arm assembly are very different from the ones
appearing in the instructional videos. I spent several hours
searching the Robix web site and the Internet for information on how to
properly assemble these new parts. I found nothing--even on
the Robix site. Assembly of all of the other parts are
covered quite well in the videos, but absolutely nothing on the new
base and pivot arm assembly.
I guessed as best I
could and managed to get the servo motor mounted to the pivot arm and
the pivot arm mounted on the base. Although it did seem to
work, the assembly seemed a bit flimsy and I didn't quite trust
it. I decided to email the Robix company and see if they
could offer any help. I was hesitant because I figured I
would get either no response, or have to wait weeks for it.
Much to my surprise, I received a response within 24 hours!
As a matter of fact, any time I have had to email Robix for help, I got
a response within 24 hours. So far, I am very impressed with
the customer service. It turned out that I had most of it
right, but there was a hidden screw in the middle of the pivot arm that
locks down the servo motor. Robix sent me an explanation of
how to do the assembly, as well as drawings of the pivot arm.
If I didn't ask, I'm not sure how long it would have taken me to
discover that hidden screw--assuming I ever did.
I
emailed again asking why they didn't update their
documentation. I am a science teacher and a technician and I
had trouble figuring it out--I wonder what other, less technologically
inclined customers did to figure out how to assemble that pivot
arm. I was told that "in the spirit of education and
experimentation," the documentation was incomplete so that people could
learn as they figured it out for themselves. I don't see how
that
can be the case considering that every other component of
the system is thoroughly addressed in the instructional video,
including the old version of the base and pivot arm assembly.
If they wanted people to have to figure it out for themselves, then
they should have provided no instructions on any of the parts instead
of just leaving out instructions on one of the most critical
parts. Besides, Robix seems to be very safety-minded when it
comes to robotics. Their literature and their web site is
filled with tips, suggestions and warnings. Had I used my
original assembly (before getting instructions and finding out about
that hidden screw), the robotic arm would have eventually come
completely loose at the first joint which could have made for a rather
dangerous situation depending upon what the robot was doing at the
moment it came apart. I am very grateful to the Robix company
for
providing the information so quickly and helping me to get up and
running.
That pivot arm glitch aside, I am
very impressed with the Rascal kit and with the customer service I have
received so far. When it comes to technology, I am not very
easily pleased, but I am very satisfied with the Rascal robotic arm
kit. Honestly, for the price, this is the buy of the century!
Now
I have to figure out how to use the software and controller that comes
with the Rascal kit. July 5, 2007
After
much research, I have settled on the Rascal robotic arm kit from
Robix.com.
I decided on the Rascal because of its price,
simplicity, the fact that I could only find good reviews about it on
the Internet, and I was impressed seeing the Rascal making coffee and
throwing ping pong balls in videos available on the Robix.com
web site.
My employer approved the project and the Rascal has been ordered.
I decided to create this blog because there just were not enough
reviews and ideas on the Net from people who had purchased a Rascal
kit. I decided to help fill this void by adding my own blog
to let others see how the Rascal works out in my application.
The
Rascal robotic arm kit cost me $558.00 including shipping.
Since
it comes as a kit with extra parts, it should be easily reconfigured
and adapted to different tasks. I anxiously await its arrival. June 13, 2007
I
work in a sheltered workshop for people with developmental disabilities. By job is to design, construct and implement
adaptive equipment and devices which help persons with physical and
mental disabilities to work, play and participate in daily
activities.
We have such a large variety of jobs and
activities available that building a separate device for each is not
practical. In our program, that could run into hundreds of
separate devices. I need a device that is adaptable,
reconfigurable and dexterous so it can be utilized by a lot of
different people and can perform a wide variety of tasks.
My
task at the moment is to make such a device accessible to persons who
are confined to wheelchairs and are unable to use their arms and/or
legs efficiently. Many such persons in our program are able
to use their hands or heads to operate a simple push button switch
mounted on their wheelchair.
I have decided that a
simple, small, low torque robotic arm would be the way to go.
I will submit the idea to my employer for approval.